
when you load up pugl for the first time, you should be greeted with a “Buffer” widget.
try changing its “input” value to .pos.x.
.pos.x is −1 at the left side of the screen and +1 at the right side of the screen.
since the “Buffer” widget’s title is in yellow,
the pixel values will be drawn from it. 0 (or anything below 0) is black and 1 (or anything above 1) is white,
so we see a gradient from black to white starting from the center of the screen.
now let’s try something a little more interesting. try adding a “Multiply” widget (by searching for it or
selecting it from the “math” section). set the “a” input to .pos.x and the “b” input to
.pos.y. then click on the “Multiply” text to set it as the active widget.


well, black & white is pretty boring. let’s try making some colors!
one of the nice things about shaders is that they’re very good at dealing with vectors.
there’s a lot of mathematical theory behind vectors, but for our purposes all that really matters is that a vector is a list of numbers (called components).
in shaders you basically only deal with vectors with 2 to 4 components (referred to as x, y, z, w).
in graphics programming, colors are represented as vectors with 3 components, red,
green, and blue, which go from 0 to 1.
try putting 0,0.8,1 in a “Buffer” widget and making it active.
now the widget is outputting a vector with x=0, y=0.8, and z=1, so
you’ll get a nice greenish blue color!
.pos is itself a vector, so you can just throw it into the Buffer input:

.pos is high)
and green at the top of the screen (where the y component of .pos is high).
most widgets like Multiply work on both numbers and vectors. try multiplying together
.pos and .pos.x:

.pos by .pos.x.
so the top-left corner is red, because (−1, 1) × −1 = (1, −1), so the top-left pixel gets a red value of 1 and a green value of −1.
you can use the output of one widget to specify the input of another widget using its name.
try creating an “Add” widget with inputs mul1,0 and 0,0,.pos.x (assuming
your Multiply widget from the last section was called mul1).

.pos.x is 1) is bluer!
alright let's use all this to make something cool.
we'll start by making a rainbow.
the “Hue shift” widget shifts the hue of a color through the rainbow.
so if we start with a color of red, and shift it by .pos.x,
we'll get a rainbow across the screen:

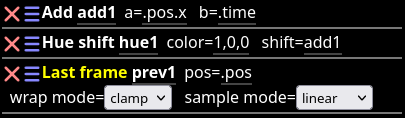
now let's animate this rainbow: create a new “Add” widget,
and set a=.pos.x, b=.time,
and use that as the shift instead of .pos.x:

next we’ll use the widget that makes pugl unique ☺ “Last frame”. this lets you grab pixel values from the previous frame to use in the current frame. add a “Last frame” widget, and set it as the active widget. notice how the rainbow freezes in place — that’s because each pixel value is just being determined by what it was on the last frame.
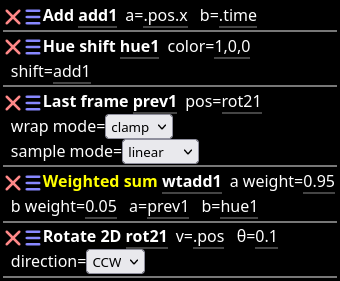
now add a “Weighted sum” widget, set “a weight” to 0.95, “b weight” to 0.05, ”a” to your last frame widget's output, and “b” to the hue shift's output. this will output a value which is 95% like the previous frame's value, and 5% like the shifting rainbow.

now, we don’t have to use .pos as the position for getting
pixel values from the last frame. instead, let’s rotate .pos
by a small amount and use that as the position for the “Last frame” widget:

be sure to check out the rest of this guide to learn all the things you can do with pugl. have fun! 🐱